Categories
Books The writing process

Word Tip 5: How Not to Indent a Line

Microsoft Word Tips for Authors

Welcome to the next in a series of tips on using Microsoft Word, geared towards authors.
Most Word advice is rather complicated and full of things you’ll never need to know.
I shall do my best to keep it simple, because you’re not stupid… just busy.
Please note: 
– Not all versions of Word are the same, but most are near enough.
– There are different ways of doing the same thing. I shall demonstrate just one (or two).

Your next line is the start of a new paragraph and you’ve decided you want the first line of the paragraph to begin further in from the margin… indented. So you press the space bar a few times and the paragraph’s first line is indeed indented.

Shocked

No! That would have been fine on a typewriter. But nowadays we use fonts that have proportional spacing. We might change fonts in a document. The space taken up by six spaces at the beginning of one line might not be the same as the space taken up by six spaces at the beginning of a different line. You’ll struggle and fail to line up your indentations. Your document will look messy.

A better method is to press the Tab button. That will jump to the same place every time, providing that all tabs are defined the same way for all your paragraphs.

An even better method is to modify the style, which, unless you’ve changed it, is called the Normal style. Here’s how:

  1. With the cursor on a paragraph, click the little arrow in the bottom right corner of Home → Styles.
  2. Hover over Normal in the Styles box and click the arrow that appears.
  3. Click Modify.
  4. Click Format → Paragraph.
  5. Click Indents and Spacing
  6. Click the arrow under Special: and choose First line.
  7. Under By:, set the amount of space you want to leave on the first line of each paragraph. (Mine is set to 1.27 cm.)
  8. Click OK twice.

Every Normal paragraph will have its first line indented by the amount you defined.

Next week we’ll look at Track Changes and Compare.

Questions and suggestions for future topics are welcome in the comments below.

Links to Previous Word Tips

  • Tip 1: A Matter of Style
    About heading styles.
  • Tip 2: Make Your Novel a Trampoline
    How to jump swiftly and gracefully between chapters.
  • Tip 3: That’s Not What I Wrote
    How to stop Word making changes you don’t want.
  • Tip 4: How Not to Jump to a New Page
    Press Enter until a new page appears? Please don’t.
Categories
Books The writing process

Word Tip 4: How Not to Jump to a New Page

Microsoft Word Tips for Authors

Welcome to the next in a series of tips on using Microsoft Word, geared towards authors.
Most Word advice is rather complicated and full of things you’ll never need to know.
I shall do my best to keep it simple, because you’re not stupid… just busy.
Please note: 
– Not all versions of Word are the same, but most are near enough.
– There are different ways of doing the same thing. I shall demonstrate just one (or two).

You’ve reached the end of a Chapter 1. You want Chapter 2 to begin on a new page. So you keep pressing Enter until, lo and behold, “Chapter 2” is on the next page.

Shocked

No! Don’t do it! Here’s why:

Every time a change is made in Chapter 1 that affects the number of lines in the chapter, Chapter 2 will no longer appear at the top of the next page. If you’ve done this for every chapter in the novel, you’ll have to go through the document correcting the number of Enters before each new chapter.

What should you do instead? I’m going to mention two methods.

Method 1

Word Show-Hide Button
Show/Hide button

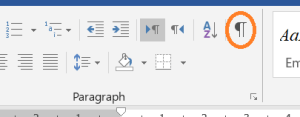
Choose Insert and then Page Break (or just press Ctrl/Enter). This jumps to the next page, solving the problem. But you can’t see the page break unless you press the Show/Hide button on the Home tab. This means you (or someone else) might inadvertently add something before the page break that should go after, or vice versa. This is why I prefer…


Method 2

Remember the styles I mentioned in Tip #1? If you defined your chapter headings with Heading 1 style, you can define the Heading 1 style to always begin on a new page. Here’s how:

  1. With the cursor on a chapter heading, click the little arrow in the bottom right corner of HomeStyles.
  2. Hover over Heading 1 in the Styles box and click the arrow that appears.
  3. Click Modify.
  4. Click FormatParagraph.
  5. Click Line and Page Breaks and then Page break before.
  6. Click OK twice.

Every Heading 1 paragraph will now appear at the top of a new page.

Of course, while you’re doing that, you might find other Heading 1 definitions to change.

Method 2 might look longer than Method 1, but you only have to do this once in order to make every chapter heading start on a new page.

Questions and suggestions for future topics are welcome in the comments below.

Links to Previous Word Tips

  • Tip 1: A Matter of Style
    About heading styles.
  • Tip 2: Make Your Novel a Trampoline
    How to jump swiftly and gracefully between chapters.
  • Tip 3: That’s Not What I Wrote
    How to stop Word making changes you don’t want.
Categories
Books Holidays

Cherry Blossom

Cherry Blossom
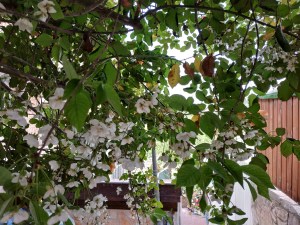
Cherry blossom in Jerusalem (not as colourful as in Japan, but still pretty)

The Philosopher’s Path in Kyoto, Japan is renowned for the cherry blossom that adorns the cherry trees that line its route.

Martin and Fiona get to visit it towards the end of their story, but they have to imagine the blossom. It’s autumn, not spring.

My husband and I also enjoyed our walk along this path, five years ago, in autumn. We didn’t see the cherry blossom either, but we did get to taste a Fuji apple on our trip. Martin and Fiona also experience the sweet, juicy taste of a Fuji apple.

Why am I telling you all this? Read my novel to find out.

Cultivating a Fuji - Front Cover

May 15, 2019 is Launch Day.

.

CULTIVATING A FUJI is released on 15th May, but there’s no need to wait.

Categories
Books The writing process

Word Tip 3: That’s Not What I Wrote

Microsoft Word Tips for AuthorsWelcome to the next in a series of tips on using Microsoft Word, geared towards authors.
Most Word advice is rather complicated and full of things you’ll never need to know.
I shall do my best to keep it simple, because you’re not stupid… just busy.
Please note: 
– Not all versions of Word are the same, but most are near enough.
– There are different ways of doing the same thing. I shall demonstrate just one (or two).

Sometimes the text in your Word document doesn’t look the same as what you typed.

I’m not talking about typos. We all make those occasionally. I’m talking about words that Word changes off its own bat. Microsoft calls this AutoCorrect. The idea is that it can change some of your typos and spelling mistakes automatically, because it knows better than you what you meant to write, or it thinks it does.

What if it doesn’t? What if you wanted to make up a word in your novel? What if your character talks funny and you wanna show some of her peculiar jargon, ini’? You don’t want Word to automatically change any of your carefully-chosen quirks, do you?

Personally, I know of very few words that I want Word to change automatically. I don’t mind seeing squiggly lines around my novel, but I think, apart from rare cases, making automatic changes is a step too far.

How do you stop Word making automatic changes?

Choose the following sequence of options:

File –> Options –> Proofing –> AutoCorrect Options… –> AutoCorrect

There’s a box called Replace text as you type. You can untick (uncheck) it. Then Word won’t change anything automatically. But what if certain automatic changes might be useful?

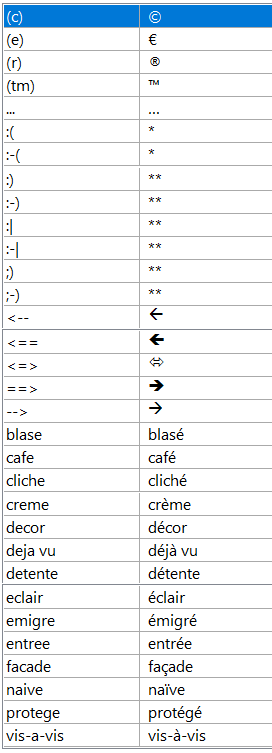
I decided to keep that box ticked (checked) and delete most of the strings it was changing. These are the ones I kept:

MS Word AutoCorrect Items

Questions and suggestions for future topics are welcome in the comments below.

Links to Previous Word Tips

  • Tip 1: A Matter of Style
    About heading styles.
  • Tip 2: Make Your Novel a Trampoline
    How to jump swiftly and gracefully between chapters.
Categories
The writing process

Word Tip 2: Make Your Novel a Trampoline

Microsoft Word Tips for Authors

Welcome to the next in a series of tips on using Microsoft Word, geared towards authors.
Most Word advice is rather complicated and full of things you’ll never need to know.
I shall do my best to keep it simple, because you’re not stupid… just busy.
Please note: 
– Not all versions of Word are the same, but most are near enough.
– There are different ways of doing the same thing. I shall demonstrate just one (or two).

Your novel becomes a trampoline when you’re editing. You need to be able to see its structure at a glance and quickly jump between chapters and sometimes sections of chapters.

This tip only works if you have defined heading paragraphs as shown in Tip 1.

Press Ctrl/F, which you probably use for searching in the novel.

The window that appears has three tabs: Headings, Pages and Results. Click on Headings. You’ll see all headings in the novel. If you’ve defined sub-headings, these will appear, too, and you can expand and collapse headings using the arrows, as you would for file names in Explorer.

I like to give my chapters names, even if these won’t remain in the final version, because the names show up in that pane on the left. And sometimes I separate a chapter into sections and give them names, too. Just so that I can see the novel’s structure at a glance.

Working with Word

How do you jump to a specific chapter or section in the novel?

Just click on it.

Questions and suggestions for future topics are welcome in the comments below.

Categories
The writing process

Word Tip 1: A Matter of Style

Microsoft Word Tips for Authors

Welcome to the first in a series of tips on using Microsoft Word, geared towards authors.
Most Word advice is rather complicated and full of things you’ll never need to know.
I shall do my best to keep it simple, because you’re not stupid… just busy.
Please note: 
– Not all versions of Word are the same, but most are near enough.
– There are different ways of doing the same thing. I shall demonstrate just one (or two).

You might think this one is a bit complex for a first tip. But I will be mentioning styles in most of the other tips, often along with alternatives, so I had to start by explaining what they are.

If you’ve never used styles, the chances are that everything you write uses the Normal style. The chances are that you just started writing using the font, font size, indentation and spacing that were defined for the Normal style. What did you do when asked to send your file in a different format? You selected the whole document (hopefully you know that Ctrl/A does that) and changed the font and size.

But what if you have headings (chapter headings or short story title)? Changing everything at once changes the headings, too. You might have to go through the novel, changing all the headings back to the way they were.

Instead, you can define the Heading 1 style for your chapter headings and keep the Normal style for the text. Here’s how:

  1. Click the arrow in the bottom right corner of Styles, which is in the Home tab. The Styles box appears.

    Styles Box in Word
    Styles Box
  2. Hover next to Heading 1 and click the arrow that appears.
  3. Choose Modify. The Modify Style window appears.
  4. Click Format (at the bottom) and choose Font.
  5. In the Font window, you can change Font style, Size and other details.
  6. Remember to click OK at the end.

Similarly, you can change the Normal style.

How do you define a chapter heading as Header 1? Here are two possible ways:

  • Click in the header and click Header 1 in Styles.
  • Click in the header and press Shift/Alt/

You can also use the Heading 2 style for sub-headings. Next week, I’ll show you why that might be useful when editing a novel.

Questions and suggestions for future topics are welcome in the comments below.

Categories
The writing process

Word Tips for Authors

Microsoft Word Tips for Authors

If you’re an author, you will probably use Word at some stage. Even if you don’t use it to create your novel or story or non-fiction book, you will probably use it when interacting with an editor.

There are plenty of Word tips out there, but these contain so much information that they look too complicated to authors who have limited time for technology and a limited number of things they want to do with Word.

And yet, there are features that would make their Word experience much more pleasant, if only they knew about them.

I’m going to try to make those features clearer by posting a tip once a week on Fridays, starting next week, 5th April. I’ll be using the hashtag #MSWordTipsForAuthors. See you back here.

If you have any questions or suggestions for topics, that’s what comments are for.

↓↓↓

Categories
Blogging Social anxiety

TEN Years Old

10 Years of Blogging

Yes, this blog has been going for TEN years. The very first post went like this:

Speech is Silver; Silence is…

…not golden. Just a fake gold that soon dulls.  Like the necklace I bought in Cyprus. They told me it was gold. I knew they were lying, but I bought it anyway. I felt I had to buy something because they gave me tea….

I’ve been keeping silent for most of my life. It’s time to talk.

So tune in again, keep in touch and don’t suffer in silence.

A lot has happened to me in those ten years.

I began the blog anonymously, and eventually ‘came out.’ I was afraid of negative comments, but so far there haven’t been any.

I’ve had short stories and three… almost four… books published.

And I talk – not so much in conversations, but through my books and even in presentations. Slowly but surely, I’m telling the world about social anxiety.

Miriam Drori - Presentation on Social Anxiety

P.S. Not all my stories involve social anxiety.

EDIT: I was happy to receive this from WordPress:

Happy Anniversary from WordPress

Categories
Books

Cover Reveal


Curtains

With everything that’s been going on… promoting the free day for Social Anxiety Revealed and lots more – bookwise and lifewise… I somehow omitted, on this blog, to announce the fabulous cover for my new novel, Cultivating a Fuji, to be released on 15th May.

Crooked Cat have created a masterpiece with this cover.

So, without further ado…

except for a crescendoing drum roll…

and a blast from the trumpet…

I present the amazing cover of Cultivating a Fuji.

Cultivating a Fuji - Front Cover

Categories
Books Social anxiety The writing process

What Not How

The other day, I tweeted the following:

You don’t have to remember how. You only have to remember what.

It was in reply to this, from @jamesgarside_:

People: How do I [do thing] on computer?
Me: *googles how to [do thing] and shows them*
People: Well, I could have just googled that!
Me: But you didn’t. You asked me.
People: YOU should know how to do it without searching for it first.
Me: You didn’t know how to do it at all!!!

The tweet contained an appropriate head-banging GIF.

I could definitely relate that to Microsoft Word. I think most authors use it, even though there is sophisticated software dedicated to writing novels. And most authors have no idea what Word can do – features that would help them immensely if only they knew about them. What, not how. Once you know that a thing is possible, you can find out how to make it happen. But if you don’t know it’s possible, you won’t think of searching, to discover how to make it happen.

Shocked SmileyImage by OpenClipart-Vectors from Pixabay

I was shocked to hear one author’s method of working with Word. She creates an Excel sheet with the starting and ending page numbers of each chapter, so that she can go directly to the chapter she wants to review. During (or after) every revision, she updates the Excel files with the new page numbers.

That would never work for me. I have so many revisions that I would never manage to keep the spreadsheet up to date. Fortunately, Word itself has a much simpler solution – one that doesn’t have mistakes because it’s built in.

Working with Word
Cropped screen shot of Cultivating a Fuji in Word

This is how Word looks as I’m working on a novel. Down the left-hand side is my list of chapters. I give the chapters names, even if the names won’t remain in the final version. That way, I know roughly what’s in each chapter. When I want to review a specific chapter, I click on the chapter in the list and Word jumps right there. So much simpler than going to a separate file, rembering a page number and then going to that page in the Word file.

Sometimes I divide the chapter into scenes by creating sub-headings, which also appear in the list. The sub-headings won’t be included in the final version of the novel, but they’re useful while it’s still being written/edited.

I might not remember exactly how to set this up without trying it out, first. I might even need to google it. But the main thing is that I know it’s possible. What, not how.

You don’t have to remember how. You only have to remember what.

Could that apply to other walks of life? What do you think?

~~~~~

News

To celebrate the forthcoming publication of my novel, Cultivating a Fuji, the ebook version of my non-fiction book, Social Anxiety Revealed, is completely free for one day only. Today. Do hurry to download it before time runs out…